
Film’s Worst Enemies (7 common film issues)
Posted by Brian Wright on
“Here today, gone tomorrow...”
A predominant theme in the modern digital world around us. The greatest appeal of photography is the ability to capture that fleeting moment. To lock it, in true permanence, with the swift and sure click of a shutter. But as with all things ones and zeros, digital photography is by nature immaterial. Film photography, on the other hand, is a physical process with immutable results.
Perhaps this is part of film's appeal to photographers. It’s permanence, it’s physicality, forces you to care about what you are doing. To have patience. To be deliberate. To trust yourself and your gear. While there is something to be said for the “happy accidents” and imperfections that sometimes come with photographing on film, there are things you can do to help ensure the quality of the moments you capture on this permanent, physical medium.
 |
| Michael Ash Smith |
FILM’S WORST ENEMIES
We field a variety of inquiries for people experiencing issues with their film images. As results continue pouring in from our CineStill 120 Alpha production, we expect even more, since we asked our Film Makers for their feedback. Below are seven common adversaries to film, and some tips for how to avoid them!Enemy #1. Old Age
Before film is processed into permanence, it is perishable! Just like a carton of milk or fresh vegetables, there comes a time when consumption would be unadvisable. The same goes for film. There will come a point when unprocessed film may leave a bad taste in your mouth.
 |
| Correne Durand |
Identifying it:
The color will be strange and the contrast muddy. Most commonly there will be aberrations in the shadows, usually creeping in from the edges. This destructive effect (caused from the combination of time, heat and radiation) is known as “Age Fog.” *
 |
| Chris Gampat - Editor in Chief of The Phoblographer |
* In particular, CineStill Film is one of the more perishable films on the market just behind instant films. On our website, we have always recommended shooting CineStill within 6 months of purchase and freezing whenever possible. Originally, we did not have expiration dates on our film because we had not been making it long enough to observe just how long it would last. Over a year ago we were able to run tests from archived film dating back to our original beta rolls, and we found that CineStill is good for one year from manufacturing. Immediately, we began implementing new expiration dates. If you have film without expiration dates, you should assume it's expired. If you choose to shoot it anyway, you should expect varying degrees of age fog to emerge.
Avoiding it:
Variables such as heat and humidity can contribute to “Age Fog”, so it is best to store your film in a cool dry place and only purchase what you will shoot within 6 months. You can also freeze film, but that will not stop aging completely and you have to be carful not to damage the film further.
When freezing film it must be placed in an air tight container and not opened until it has sufficiently adjusted to room temperature. After removing old film from cold storage, it should be tested, shot and developed immediately, or else it will age rapidly and your film will gain no benefit from cold storage. You also should not re-freeze film once it has been thawed.
Basically, nothing is better than fresh film!
Enemy #2. Dust and Dirt
We have all seen it — those little specks on our images that should not be there. Like pops and fuzz on vinyl records, dust, grime and sometimes lint can get on our film and become a part of your photograph.
 |
| Gable L'Heureux |
Identifying it:
Black dots or dark shapes in our image are from dust and dirt in our cameras. Sometimes, even a hair can get in there and become a real bugger. Basically, something is blocking the light from exposing the film, causing a silhouette of whatever the object is. I remember in school a classmate even had an entire roll turn out with giant ant shadows over most of his images.
White specs or markings come from dust getting on your film after processing. This is the most common markings you will find on scans and prints. The good thing about white spots is that they are easy to get rid of. Just clean your film and scan, or print, again in a dust free environment.
Avoiding it:
Basically, keep your cameras, darkroom and anywhere film is present clean!
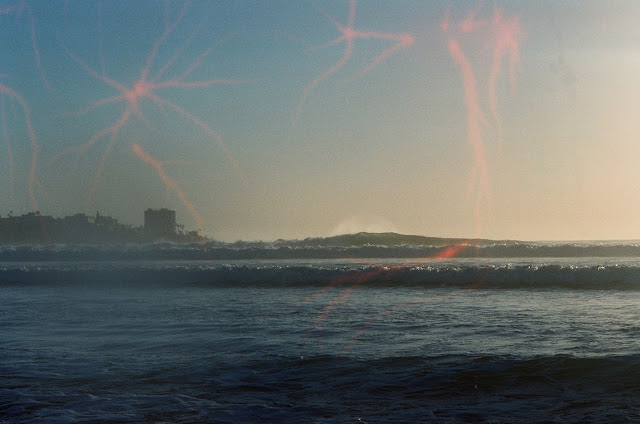
Enemy #3. Static
Static is created by friction. It can build up on parts of film, equipment, or in winding. Sometimes even when loading the film for processing. If it builds up enough it will ark to the closest neutral or oppositely charged material. It is most likely to occur in a cool and dry environment where humidity is below 40%. Static sparks on film are highly improbable if the humidity is over 60%.

Identifying it:
Electrostatic can cause many problems with film. It attracts dust, and if it is bad enough, it can even cause sparks that will show up on your film as blue or red marks. Though uncommon, this problem can show up more easily on highly sensitive films such as CineStill 800T or other high-speed/pushed emulsions.
 |
| Ryan Muirhead on pushed Tri-X 120 |
Avoiding it:
If it is cold and dry where you are shooting — slow down! Static will not form as quickly if you handle your film carefully and slowly.
Enemy #4. Light Leaks
This is probably one of the most common and most contentious accidents that can be with film. Light leaks can be kind of fun in some circumstances, and even create cool effects on your image. But when they are unwanted, they can be very very hard to cure.
 |
| Gable L'Heureux |
Identifying it:
The most common occurrence of light leaks is at the very beginning of the roll. Sometimes light can slowly “pipe” in past the felt on the film canister and cause red stripes on the first image or two, or along the edges of 120 roll film when wound too loosely. Other times it will contact print the writing from the backing paper into your image, but most of the time it just washes your exposure with uneven splash of light.

Avoiding it:
The best way to avoid light leaks (if you don’t love them that is) is to be sure that your camera has fresh light seals and that you avoid exposing your undeveloped film rolls to bright light for any period of time. Be sure to run fresh test rolls through your cameras before an important shoot, and always keep your rolls of film in a dark place like a bag or film case.
Enemy #5. Physical Damage
One of the more frustrating things that can happen is when your film becomes physically damaged. This is film’s closest equivalent to a corrupted memory card (it is sometimes unavoidable until after it is too late), with the exception that you can still get some interesting images out of it.
 |
| Danny Clinch on CineStill 120 (Prototype from 65mm IMAX film) |
Identifying it:
Film is delicate and can be scratched, creased, torn or even exposed if handled too roughly. The most common damage to film comes in the form of scratches – often long straight lines going the length of the film. Less frequently, you might see things like little white crescents caused by creased film, or colorful splatter from chemical contamination. Almost all damage to the film is caused by the camera itself, or in the processing of the film.


These images were taken on a roll of film that was in a camera that had orange juice spilled on it. It soaked in the orange juice for days and then was rolled back into it’s canister. The film was stretched, scratched, contaminated, and even ripped in a few spots. Although strange, they are rather interesting.
 |
| Correne Durand |
Avoiding it:
Make sure that your cameras all have a regular C.L.A. and that you use a reputable lab. The biggest thing that can prevent damaged film is experience. Once you've damaged film you know how not to do it ever again.
Enemy #6. Thin negatives
Film records light to create an image. If your film is Underexposed (when not enough light reaches the film) or if your exposure begins to fade from Latent Image Failure (when too much time passes between exposure of the latent image and development), the recorded image will be faint on the processed film. This is what we call “thin” negatives. This is perhaps the most notorious enemy of film.

Identifying it:
Thin negatives result in excessive grain, poor shadow detail, and flat images. Though the exposure should be dark, the image can be brought up by scanning or printing lighter. This causes more separation between the tones in the grain, therefore making the grain much more visible. To make up for the flat image, you will be tempted to add contrast in post, but this will make it even grainier.

Avoiding it:
The best way to prevent underexposed, or thin, images is by overexposing when you shoot. Film can be nearly impossible to blow out. If too much light hits film, an image will still be produced on a negative. An overexposed negative, even 3 to 4 stops over, can then be corrected in scanning or printing.
Film captures images with a photochemical reaction in the emulsion when exposed to light. A "latent image" is formed on a molecular level from silver halide that is invisible to the eye but for all intensive reasons, permanent. That image is so subtle and delicate though that it must be developed (amplified) to make it visible.
If you suspect you may have underexposed your film, and as a result will be left with “thin” negatives, the only thing you can do is push process the film promptly. This will amplify the latent image before it can start to fade.
“Latent Image Failure” can occur over time, when an invisible "latent image" is formed in the emulsion during exposure, but begins to fade away before it is made more permanent through physical development. The first thing you will lose is the areas of the image which were least exposed to light, your shadows. If an image is exposed and then left for several weeks or months before processing, you can lose even a stop or two in valuable shadow detail. This will result in a softer, lower contrast and grainier image.
The only way to avoid “latent image failure” is to develop your film as soon as possible after shooting. If you discover an old roll some where in your bag, and you have no idea where it came from or what’s on it (come on, am I the only one?) you can always push process it. This will help bring out more of the remaining latent image on the film.
Enemy #7. Poor Quality Scans
This last enemy is likely the most common but the least permanent one. When good negatives are not scanned well, the quality of the developed image is not accurately represented.
Identifying it:
This can appear in the form of dirty scans, poor color and density correction, or low resolution output. Your images will have a terrible color cast, no black point, or worst of all clipped highlights.

The Image above shows two "straight" scans from the same exposure on CineStill 800T, made with the same film scanner. The one on the left had no attention given to it, and the scanner made it far too light and with a yellow bias in color correction. The right image was scanned correctly and the difference is unmistakeable.
Avoiding it:
In any of these cases, the solution is simple. Re-scan the images better!
A good lab is a photographer’s best friend. Find one you can trust and you will never regret it.
If you are interested in learning more about COMMON SCAN & FILM ISSUES, our friends at Richard Photo Lab composed an in depth article as well.
Life is fleeting, Film is permanent...
In a time of immediacy and convenience, photographing on film is a refreshing change of pace. For many, film satisfies the desire to slow down and enjoy the process of something they truly love. So knowing how to get the most out of it is of utmost importance. The above problems are film's worst enemies. By avoiding them, you will be well on you way to obtaining the best results film has to offer. So invest in fresh film, handle it with care, and shoot and develop it as quickly as possible. Do this and all your memories and beautiful images will be here to stay for generations to come.
CineStill bible… invaluable information for shooting CineStill film!